
ESP32-C3: Servo Motor Sweep
ESP32-C3: Servo Motor Sweep is a runnable microcontroller simulation example on SensBench — open the wired circuit, inspect the code, and compile real firmware in your browser, no install needed. Last updated Aug 14, 2026.
FREE SIMULATOR EXAMPLE · BEGINNER
ESP32-C3: Servo Motor Sweep
This example sweeps a servo from 0° to 180° and back on GPIO10 of the ESP32-C3, in 3° steps, forever. It uses the ESP32Servo library with an explicit 500–2400 µs pulse range, and the Serial Monitor announces each time the horn hits an end stop.
| Board | ESP32-C3 (RISC-V single-core, 160 MHz) |
|---|---|
| Difficulty | beginner |
| Category | robotics |
| Libraries | ESP32Servo |
| Runs in | Sensbench browser simulator — free, no account |
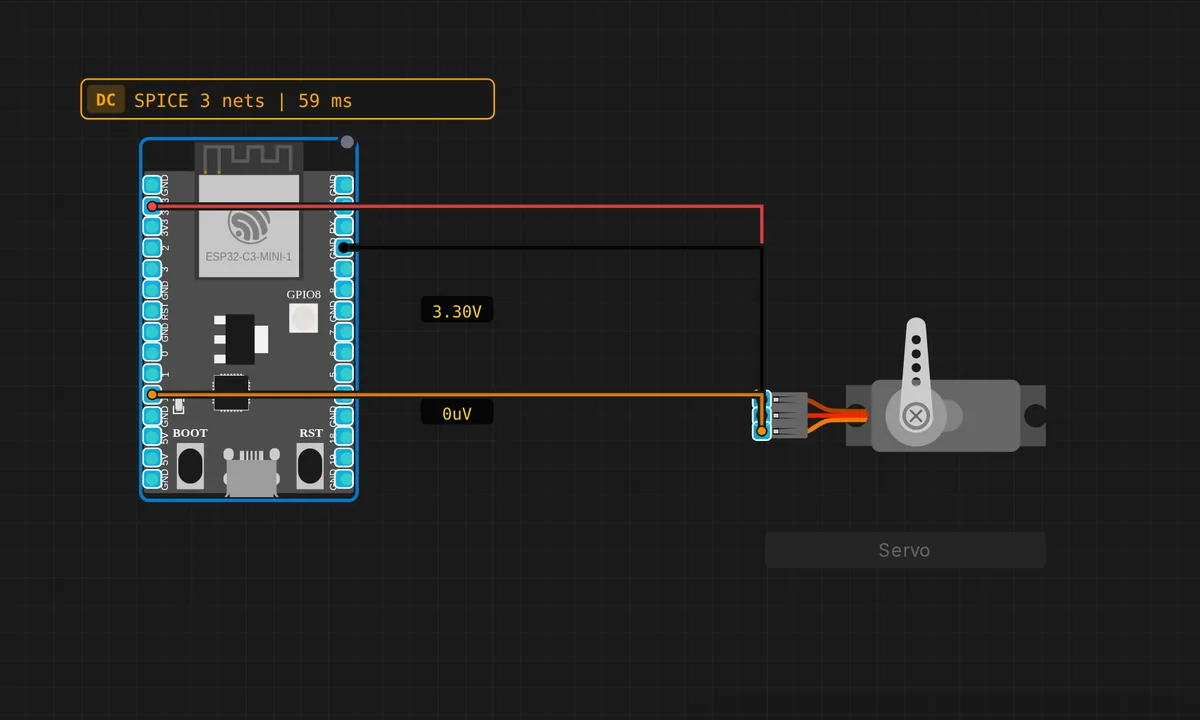
The exact circuit you get when you open this example — already wired, ready to run.
The sketch
// ESP32-C3 — Servo Motor Sweep
// Wiring: PWM → GPIO10  |  V+ → 3V3  |  GND → GND
// Uses ESP32Servo library

#include <ESP32Servo.h>

#define SERVO_PIN 10

Servo myServo;

void setup() {
  Serial.begin(115200);
  myServo.attach(SERVO_PIN, 500, 2400);
  Serial.println("ESP32-C3 Servo Sweep");
}

void loop() {
  for (int a = 0; a <= 180; a += 3) { myServo.write(a); delay(20); }
  Serial.println("180 deg"); delay(300);
  for (int a = 180; a >= 0; a -= 3) { myServo.write(a); delay(20); }
  Serial.println("0 deg");   delay(300);
}
How it works
myServo.attach(SERVO_PIN, 500, 2400) does two things: it hands GPIO10 to the library’s PWM driver, and it remaps the pulse range — 500 µs for 0°, 2400 µs for 180°, instead of the default 544–2400. Cheap servos vary a lot from unit to unit, and an explicit range is how you get the full throw instead of the middle eighty percent.
The sweep is two for loops stepping 3° at a time with delay(20) between writes. Twenty milliseconds is one full PWM period at a servo’s 50 Hz update rate, so every step gets at least one fresh pulse — that is what makes the motion smooth instead of steppy. Sixty steps up, a 300 ms pause with a Serial message, sixty steps down.
Under the hood, ESP32Servo drives one of the C3’s LEDC timer channels — the same peripheral used for LED fading — so the 50 Hz signal keeps running in hardware while your code sits in delay(). No bit-banging, and no jitter from loop timing.
Before you build it for real
The one-line wiring diagram hides the mistake everyone makes exactly once: powering the servo from the 3V3 rail. In the simulator that pin has infinite current behind it; on the board it has maybe 500 mA, and a working SG90 wants most of that. The first hard move pulls the rail down, the C3 browns out and resets, and you spend an hour debugging code that was never wrong — power the servo from its own 5 V supply with the grounds connected. The 500–2400 µs range in attach() also deserves respect: push past the horn’s mechanical stop and the motor stalls, draws maximum current, and cooks itself quietly.
Get the parts
Related examples
FAQ
Why does my real board reset as soon as the servo moves?
Brownout. The servo pulls more current than the 3V3 regulator can supply, the rail sags, and the ESP32-C3 reboots. Power the servo from a separate 5 V supply, connect the grounds, and the problem disappears.
What do the 500 and 2400 in attach() do?
They set the pulse widths in microseconds that map to 0° and 180° — the defaults are 544 and 2400, so widening the low end to 500 buys a bit more throw on most SG90 clones. Go too far and the horn hits its mechanical stop and stalls; you will hear it buzz, and it is cooking the motor while it does.